Xero #
Connecting Your Xero Account #
- Request to enable the Accounting Section of your Volopa Business platform by navigating to the Additional Services page, found in the settings section, and clicking “Enable”.
- Once the Accounting Section has been enabled for your account, navigate to it by clicking “Accounting” in your product switcher.
- Now, click “Connect to Accounting Software”.
- Select Xero from the list of available integrations and click “Next”.
- Review the information that will be shared with Volopa upon connecting and then click “Next”.
- On the next page, log in to your Xero account and grant Volopa access to the displayed organisational data, before confirming the company you wish to connect.
- On the resulting confirmation screen, click “Next” and then “Finish” to complete the connection. Your account will take a few minutes to be set up, after which you can configure the integration on the Configuration page.
Please note: This connection must be reauthorised every 60 days due to the Open Banking regulations. All you need to do is disconnect your Xero account through the Volopa platform (using the button in the bottom right of the Configuration page) and then repeat the above steps. Any changes you have made in the configuration page will be saved, even after disconnecting.
Configuring your Accounting Integration #
The configuration page of the Accounting section of your Volopa Business platform allows you to allocate Volopa Categories to Account Codes and VAT Codes pulled in from your Xero platform. Therefore, when one of your cardholders selects a Volopa Category in the Specific Transaction History page, the corresponding Account and VAT Codes will be pre-selected in the Transactions page of the Accounting section.
Additionally, this page allows you to select if you wish to sync expense information, which cards you wish to sync information for and which account in your Xero platform you wish to sync your Volopa Transactions with.
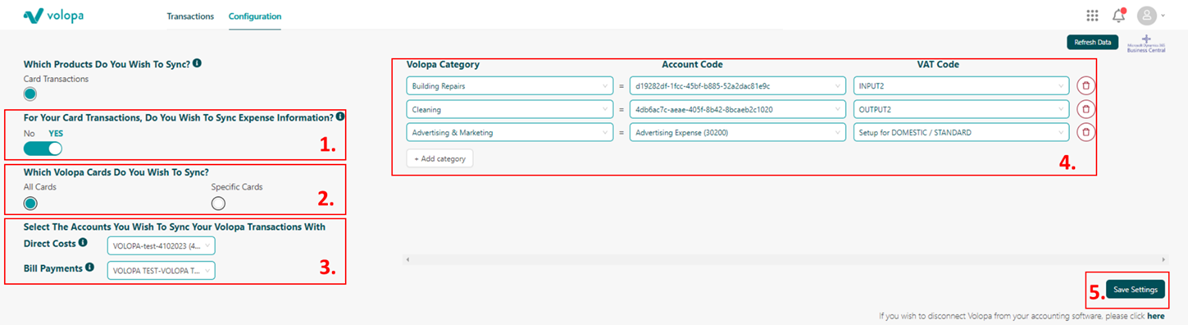
To configure your Xero integration, please follow the steps below:
- Let us know if you wish to sync expense information (E.g. Attachments and Notes) associated with your card transactions using the Yes/No toggle.
- Select whether you would like all Volopa cards to be synced or just specific cards. If you only wish to sync specific cards, please them from the resulting pop-up. We recommend you select all cards.
- Select the account in Xero you wish to sync your Volopa transactions with using the dropdown provided.
- Assign corresponding Account and VAT codes to the Volopa categories.
- Click “+ Add Category”.
- Select a Volopa Category from the dropdown list.
- Select a corresponding “Account Code” and “VAT Code” from the options pulled from your Xero Account.
- Repeat until all your desired codes are mapped.
- Finally click “Save Settings”.
Syncing Transaction with Xero #
With a Xero account integrated, you can sync both Expense Information and Bank Feeds (up to one year back) from your Volopa platform. Expense Information encompasses any settled transactions made using your Volopa cards, including ATM withdrawals and any transactional fees; while Bank Feeds cover any movement of funds into or out of your Volopa Account, such as Wallet Funds. Refunds can be synced from both the Expense Information and Bank Feeds tabs. Syncing these transactions will also push any associated attachments or notes to your Xero account. All synced transactions will appear in your Xero platform in your Volopa account’s base currency. When synced, card details, original transactional currency and amount, exchange rates, merchant information and any notes can be found in the Description field in Xero.
Please note: You can only sync settled transactions, pending transactions will not appear in the Accounting section until they have settled.
Syncing Expense Information #
- Navigate to the Transaction page of the Accounting section in your Volopa Business platform
- Select “Expense Information” in the top left corner of the page
- Using the dropdown in the top left corner, select “View Unsynced Transactions”
- Select an Account Code and VAT Code from the dropdowns for the transactions you wish to sync or review the pre-filled Account and VAT Codes based on the Volopa Category input by your cardholders in the Specific Transaction History page.
- Optional: Select a Tracking Category (Referred to as “Tracking Categories” in Xero) from the dropdown for further categorisation if your company uses these. The options in this dropdown are pulled from your Xero account, excludes deleted, inactive and sub-parent categories, and is limited to 200 records.
- Select the transactions you wish to sync or click “Select All” before clicking “Sync Selected”.
- These transactions will now appear as “Pending” and will be moved to the “Synced Transactions” page once successfully pushed to your Xero platform.
A Synced Transaction as it appears in Xero:
Syncing Bank Feeds #
- Navigate to the Transaction page of the Accounting section in your Volopa Business platform
- Select “Bank Feeds” in the top left corner of the page.
- Using the dropdown in the top left corner, select “View Unsynced Transactions”.
- Select the transactions you wish to sync or click “Select All” before clicking “Sync Selected”.
- These transactions will now appear as “Pending” and will be moved to the “Synced Transactions” page once successfully pushed to your Xero platform.
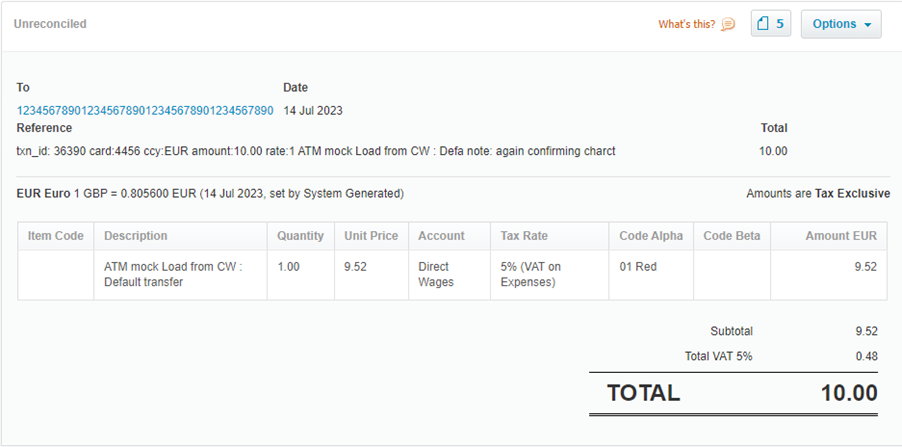
A Company Wallet Load synced using Bank Feeds (as it appears in Xero):

#
QuickBooks Online #
Connecting Your QuickBooks Online Account #
- Request to enable the Accounting Section of your Volopa Business platform by navigating to the Additional Services page, found in the settings section, and clicking “Enable”.
- Once the Accounting Section has been enabled for your account, navigate to it by clicking “Accounting” in your product switcher.
- Now, click “Connect to Accounting Software”.
- Select QuickBooks Online from the list of available integrations and click “Next”.
- Review the information that will be shared with Volopa upon connecting and then click “Next”.
- On the next page, log in to your QuickBooks account and grant Volopa access to the displayed organisational data, before confirming the company you wish to connect.
- On the resulting confirmation screen, click “Next” and then “Finish” to complete the connection. Your account will take a few minutes to be set up, after which you can configure the integration on the Configuration page.
Configuring Your Accounting Integration #
The configuration page of the Accounting section of your Volopa Business platform allows you to allocate Volopa Categories to Account Codes and VAT Codes pulled in from your QuickBooks platform. Therefore, when one of your cardholders selects a Volopa Category in the Specific Transaction History page, the corresponding Account and VAT Codes will be pre-selected in the Transactions page of the Accounting section.
Additionally, this page allows you to select if you wish to sync expense information, which cards you wish to sync information for and which account in your QuickBooks platform you wish to sync your Volopa Transactions with.
To configure your QuickBooks integration, please follow the steps below:
- Let us know if you wish to sync expense information (E.g. Attachments and Notes) associated with your card transactions using the Yes/No toggle.
- Select whether you would like all Volopa cards to be synced or just specific cards. If you only wish to sync specific cards, please them from the resulting pop-up. We recommend you select all cards.
- Select the account in QuickBooks you wish to sync your Volopa transactions with using the dropdown provided.
- Assign corresponding Account and VAT codes to the Volopa categories.
- Click “+ Add Category”.
- Select a Volopa Category from the dropdown list.
- Select a corresponding “Account Code” and “VAT Code” from the options pulled from your QuickBooks Account.
- Repeat until all your desired codes are mapped.
- Finally click “Save Settings”.

Syncing Transaction with QuickBooks Online #
With a QuickBooks account integrated, you can sync Expense Information from your Volopa platform. Expense Information encompasses any settled transactions (up to one year back) made using your Volopa cards, including ATM withdrawals and any transactional fees; refunds can also be synced in this manner. Syncing these transactions will also push any associated attachments or notes to your QuickBooks account. All synced transactions will appear in your QuickBooks platform in your Volopa account’s base currency. When synced, card details, original transactional currency and amount, exchange rates, merchant information and any notes can be found in the Memo field in QuickBooks.
Please note: You can only sync settled transactions, pending transactions will not appear in the Accounting section until they have settled.
Syncing Expense Information #
- Navigate to the Transaction page of the Accounting section in your Volopa Business platform
- Using the dropdown in the top left corner, select “View Unsynced Transactions”
- Select an Account Code and VAT Code from the dropdowns for the transactions you wish to sync or review the pre-filled Account and VAT Codes based on the Volopa Category input by your cardholders in the Specific Transaction History page.
- Optional: Select a Tracking Code (referred to as “Class” and “Location” in QuickBooks) from the dropdown for further categorisation if your company uses these. The options in this dropdown are pulled from your QuickBooks account, excludes deleted, inactive and sub-parent categories, and is limited to 200 records.
- Select the transactions you wish to sync or click “Select All” before clicking “Sync Selected”.
These transactions will now appear as “Pending” and will be moved to the “Synced Transactions” page once successfully pushed to your QuickBooks account.
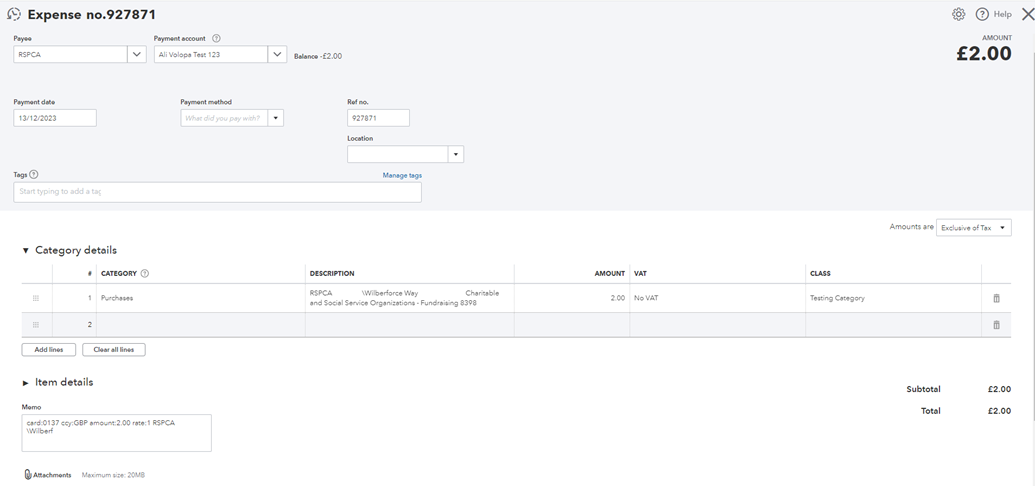
A synced transaction as it appears in QuickBooks:
Microsoft Dynamics 365 Business Central #
Connecting Your Dynamics Account #
Required permissions to link Dynamics 365 Business Central #
- Your end-user must log into their Microsoft Dynamics 365 Business Central organization and click on the magnifying glass at the top right and select the “Users” menu. Select the user that will be used to link.
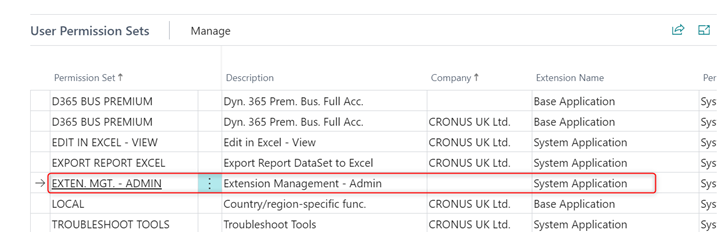
- Scroll to the User Permission Sets section and ensure that the user has access to “Exten. MGT – Admin” (also called the Extension Management – Admin permission) for the company that they are intending to link. They may prefer to leave the company column empty, especially if they plan on linking multiple Microsoft Dynamics 365 Business Central organizations using the same user.
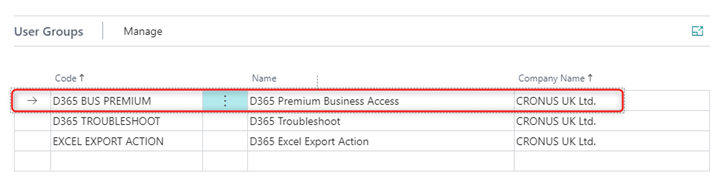
- You must ensure that this user also is part of the “BASIC” user group. This is to ensure that the user has access to the data tables queried during a sync.
Please note: If the user has a Premium D365 plan, they should be in the “D365 BUS PREMIUM” user group instead. They may prefer to leave the company column empty, especially if they plan on linking multiple Microsoft Dynamics 365 Business Central organizations using the same user.
- In addition to the permissions mentioned above, you may also want to verify that you have an acceptable Dynamics Business Central License assigned to the user that will be used during the link process. You can find this information on the same User Card, under the Licenses section. Acceptable License levels include: Dynamics 365 Business Central Premium, Dynamics 365 Business Central for IWs, and Dynamics 365 Business Central Essential.
As long as the user going through the flow has Admin/Super Permissions, including Extension Management, the extension is automatically installed during the flow. There will be 1-2 consenting steps MS will present to the user in the flow.
- During the linking process, Codat installs a Dynamics 365 Business Central extension into the customer’s Business Central environment. This extension has the following attributes:
- Description/Publisher: Codat
- Name: App Link
- The extension might take 10–20 minutes to install and the installation page might refresh repeatedly while the installation is in progress. A message displays when the extension has been successfully installed.
Connecting in Volopa #
- Request to enable the Accounting Section of your Volopa Business platform by navigating to the Additional Services page, found in the settings section, and clicking “Enable”.
- Once the Accounting Section has been enabled for your account, navigate to it by clicking “Accounting” in your product switcher.
- Now, click “Connect to Accounting Software”.
- Select Microsoft Dynamics 365 Business Central from the list of available integrations and click “Next”.
- Review the information that will be shared with Volopa upon connecting and then click “Next”.
- On the next page, log in to your Dynamics 365 account and grant Volopa access to the displayed organisational data, before confirming the company you wish to connect.
- On the resulting confirmation screen, click “Next” and then “Finish” to complete the connection.
Configuring your Accounting Integration #
The configuration page of the Accounting section of your Volopa Business platform allows you to allocate Volopa Categories to Account Codes and VAT Codes pulled in from your Dynamics platform. Therefore, when one of your cardholders selects a Volopa Category in the Specific Transaction History page, the corresponding Account and VAT Codes will be pre-selected in the Transactions page of the Accounting section.
Additionally, this page allows you to select if you wish to sync expense information, which cards you wish to sync information for and which account in your Dynamics platform you wish to sync your Volopa Transactions with.
To configure your Dynamics integration, please follow the steps below:
- Let us know if you wish to sync expense information (E.g. Attachments and Notes) associated with your card transactions using the Yes/No toggle.
- Select whether you would like all Volopa cards to be synced or just specific cards. If you only wish to sync specific cards, please them from the resulting pop-up. We recommend you select all cards.
- Select the account in Dynamics you wish to sync your Volopa transactions with using the dropdowns. You may select the same or different accounts for Direct Costs and Bill Payments.
- Assign corresponding Account and VAT codes to the Volopa categories.
- Click “+ Add Category”.
- Select a Volopa Category from the dropdown list.
- Select a corresponding “Account Code” and “VAT Code” from the options pulled from your Dynamics Account.
- Repeat until all your desired codes are mapped.
- Finally, click “Save Settings”.

Syncing Transaction with Dynamics #
With a Dynamics account integrated, you can sync Expense Information from your Volopa platform. Expense Information encompasses any settled transactions (up to one year back) made using your Volopa cards, including ATM withdrawals and any transactional fees as well as refunds. Syncing these transactions will also push any associated attachments or notes to your Dynamics account.
Please note: You can only sync settled transactions, pending transactions will not appear in the Accounting section until they have settled.
Another feature of Volopa’s Dynamics integration is that you can choose to sync your expenses as either a Direct Cost or a Bill Payment. Direct Costs are used for general expenses and are synced to Dynamics in your Volopa account’s base currency (with the transactional amount and currency contained in the “Description” field in Dynamics). Syncing as a Bill Payment will sync the transaction as an accounts payable item by creating an invoice in Dynamics to sync the against. Bill payments are synced in the transactional currency. When synced, card details, original transactional currency and amount, exchange rates, merchant information and any notes can be found in the Description field for both Bill Payments and Direct Cost.
Syncing Expense Information #
- Navigate to the Transaction page of the Accounting section in your Volopa Business platform.
- Select “Expense Information” in the top left corner of the page.
- Using the dropdown in the top left corner, select “View Unsynced Transactions”.
- Select an Account Code and VAT Code from the dropdowns for the transactions you wish to sync or review the pre-filled Account and VAT Codes based on the Volopa Category input by your cardholders in the Specific Transaction History page.
- Optional: Select a Tracking Category (referred to as Dimensions in Dynamics) from the dropdown for further categorisation if your company uses these. The options in this dropdown are pulled from your Dynamics account, excludes deleted, inactive, and sub-parent categories, and is limited to 200 records.
- Please note: Only use tracking codes that are defined with Dimension Value Type “Standard” in Dynamics. Using other Dimension Types will cause the sync to fail.
- Select the transactions you wish to sync or click “Select All” before deciding if you want to sync the transactions as a Bill Payment or Direct Cost. Please click the appropriate button for your choice in the top right-hand corner.
- These transactions will now appear as “Pending” and will be moved to the “Synced Transactions” page once successfully pushed to your Dynamics platform.
A transaction synced as a Direct Cost (as it appears in Dynamics):

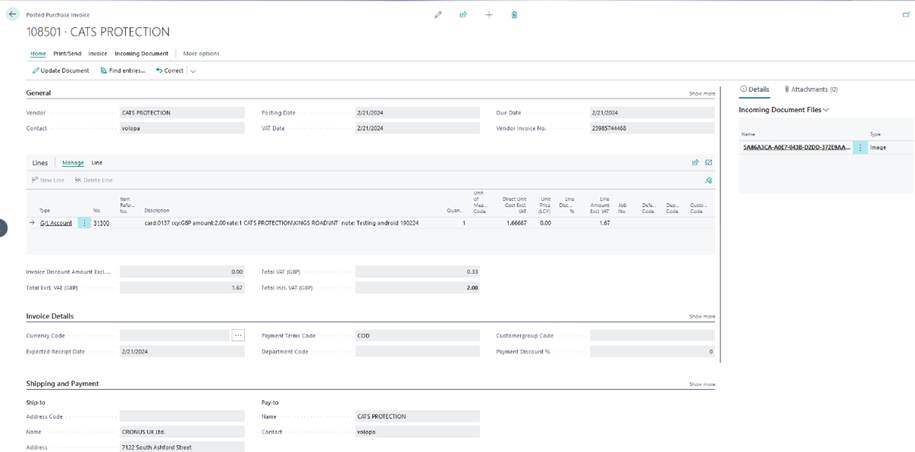
A transaction synced as a Bill Payment (as it appears in Dynamics):
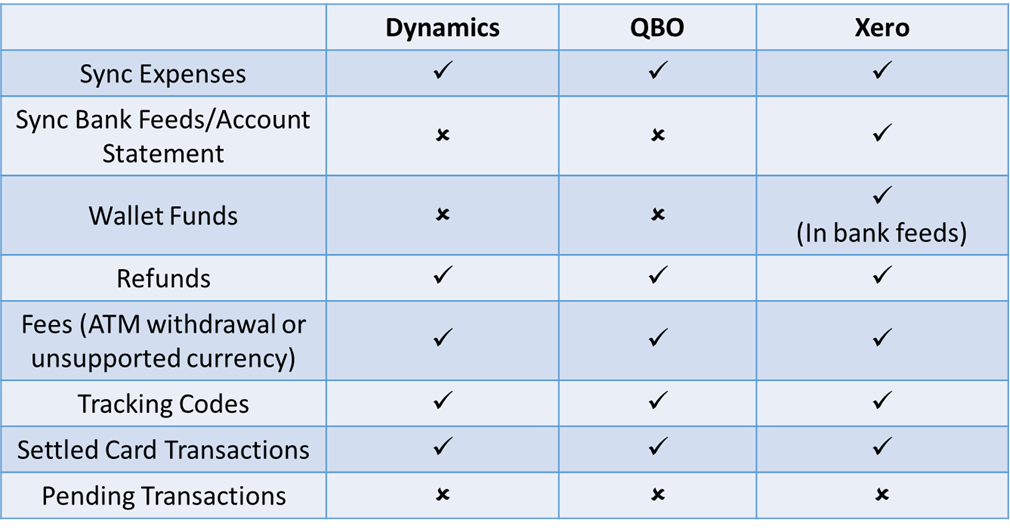
Summary Table of Capabilities for Each Integration #